
Getting started
Apertura is in final verification. Every task below is written from the shipped app, so this guide is also the list of what to try first once a build passes its checks.
Downloads are closed. Both platforms are still in verification, and no unsigned installer is linked. The download center and the status page read the same release descriptor the apps use, so they always show the live state.
Before you start
- macOS: macOS 14.0 or later on Apple silicon; the current candidate is arm64.
- Windows: Windows 10 build 19045 or later, on x64 or arm64.
- A camera if you want the games. It is read only while a game is running.
The Free tier needs no account and keeps its data on your device. AI chat on Free is limited to 10 requests a day on a free model; a license raises that limit and unlocks the higher tiers. Which modules appear in the grid depends on your tier, and pricing lists what each one includes. Read the privacy policy for every path where data can leave the machine.
1. Open the dashboard and pin your first screen
The dashboard is the module grid the notch opens into. It is not a list of every feature: the first screen holds the modules you pinned, and everything else is one step away.
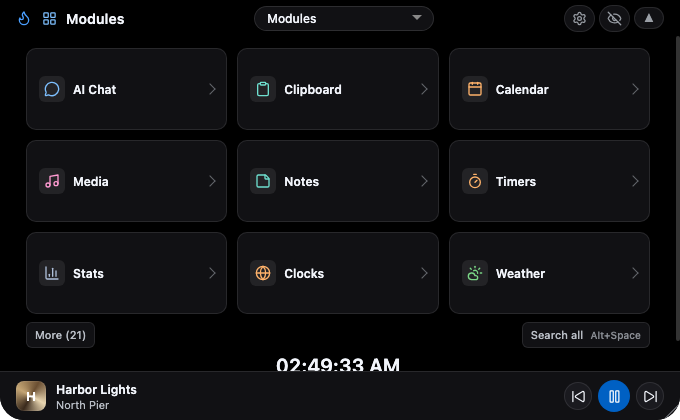
- Open the panel by clicking the notch on macOS or the tray icon on Windows.
⌃⌥⌘Dopens the dashboard directly from any app. - Pick a module from the grid to open it in place. Each tile leads to a full surface inside the panel, not to a separate window.
- Pin the modules you use every day. Up to six pinned modules fill the first screen, in the order you choose.
- Choose More to reveal the rest of the module set, and Search all to jump straight to a module by name through the Command Bar.
Light and dark themes are both painted from the same layout, and the app follows the system setting until you pick one in Settings.
2. Copy once, find it later
Clipboard history is stored on your device. Nothing from the history is sent anywhere unless you attach it to a request yourself.
- Copy text as usual. It lands at the top of the clipboard tab, newest first.
- Press
⌘1to⌘9on macOS, orCtrl+1toCtrl+9on Windows, to pick one of the first nine rows.Returncopies the selected row and⌥Return(orAlt+Enteron Windows) pastes it as plain text. - Pin what should never expire. Pinned rows survive every retention window.
- Set Keep History to Forever, or to a finite window of 24 hours, 7, 30, 90 or 365 days. Expired rows are appended to a permanent
clipboard-archive.txtfile that is never deleted, so a window moves history rather than erasing it. - Leave Mask passwords & keys on. Previews of likely secrets are hidden, and the original value is still what gets pasted.
3. Start a countdown or a focus session
Timers are one tab with three modes: Countdown, Pomodoro and Stopwatch. Choose the mode at the top of the tab and the controls below change with it.
- Countdown starts from the 5, 15 or 25 minute preset, and you can pause, resume or reset it at any time.
- Pomodoro runs 25 minutes of work, then a 5 minute short break, and a 15 minute long break after every four cycles.
- Stopwatch counts up and keeps laps, one row per lap with its own split.
- A running timer is charged from the wall clock, so closing the panel does not lose the time, and a completion you missed is reported once as finished while closed.
4. Play a camera game
The games use the camera as the input device, so a wave, a head move or a lean is the control. There are twelve of them: six classics and six early-webcam homages.
- Open the games module. The picker appears with the camera still off.
- Choose a game. The camera starts only for the game you picked and stops when the game ends or the panel closes.
- Read the one-line how-to under each title; every game uses a single gesture family, so nothing needs a manual.
- Pick another game to keep playing, or close the panel to release the camera.
Camera frames are processed locally and are never uploaded. The camera indicator in your system menu bar or taskbar shows when the camera is on.
5. Activate a license and scope the AI
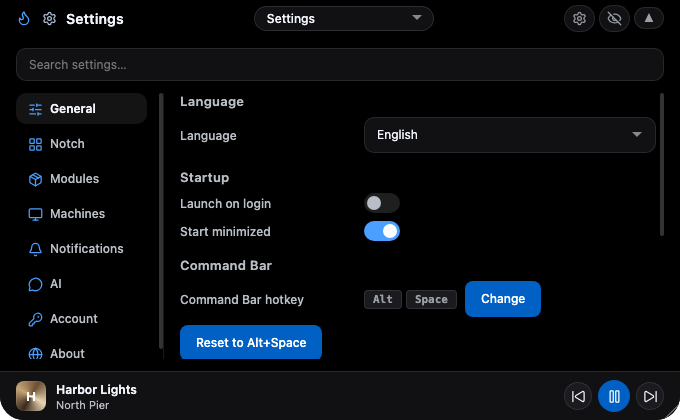
- Stay on Free if it is enough. Nothing is required to install and use the Free tier, and no account is created.
- To activate a paid tier, paste your license key into the account section of the app's settings, or start from the activation page, which checks the key's format and then hands the secure step to the app itself. Activation sends the key and a one-way device fingerprint to
api.notch-os.com; the privacy policy lists the exact fields. - Check the device panel afterwards. It shows the tier, the device fingerprint, the app version and the OS version, and it offers a Deactivate action that frees the seat.
- Decide what the AI can see. Screen context is opt-in and needs your explicit consent every time; nothing is captured or sent until you ask. On-device AI keeps the conversation on your machine, and relay-assisted AI sends only the visible conversation and what you attach.
The approved launch shape is a one-time $29 Pro license. Developer and Max exist in the entitlement design but are not sold separately, and the Max tier carries a three-device activation cap. See pricing for the current state.
Keyboard shortcuts
These are the shortcuts the app registers today. The macOS chords below are registered system-wide, so they fire from any app; on Windows the panel chords work while the panel has focus.
| Action | macOS | Windows |
|---|---|---|
| Dashboard | ⌃⌥⌘D | Tray icon or the notch |
| Ember AI chat | ⌘⌥E, and ⌃⌥A for the chat window | AI Chat tab, or Alt+Shift+Space |
| System stats | ⌃⌥⌘S | Ctrl+2 |
| Clipboard history | ⌃⌥⌘C | Ctrl+4 |
| Focus cockpit | ⌃⌥⌘F | Its module tile, or the command bar |
| Settings | ⌃⌥⌘, | Ctrl+6 |
| Switch panel tab | Not registered | Ctrl+1 to Ctrl+6, in tab order |
| Command Bar | ⌥Space | Alt+Space |
| In-panel command list | Not registered | Ctrl+K |
| Quick AI on a selection | ⌃⌥Space | Control+Alt+Space |
| Grab text from the screen | ⌘⇧2 | Ctrl+Shift+2 |
| Translate the selection | ⌃⌥T, and ⌃⌥⇧T to grab and translate | Ctrl+Shift+3 to grab and translate |
| Shortcut cheatsheet | ⌃⌥⌘/ | Settings lists the shortcuts |
The rebindable shortcuts (Quick AI, text grab, translate, Command Bar) live under Settings, where a cleared shortcut stays cleared. The macOS ⌃⌥⌘ chords are fixed.
Where to go next
- Modules: the full module set, grouped by the task each one serves.
- FAQ: downloads, privacy, AI and platform questions answered directly.
- Security: how credentials, updates and AI requests are protected.
- Release status: what each candidate build changed and what is still open.